Gitbook安装和实现自动发布
Gitbook是什么?
简单来说,把md文件搞成一个带索引的书。能转成pdf或者挂载在网站上。
Reference
- https://gitbook.zhangjikai.com/settings.html
- https://docs.gitlab.com/runner/install/
- https://docs.gitlab.com/runner/install/linux-manually.html
环境要求
- NodeJs(4.0.0及以上)
五步达成Gitbook
1.Npm安装gitbook
npm install gitbook-cli -g
其中gitbook-cli是gitbook的一个命令行工具, 通过它可以在电脑上安装和管理gitbook的多个版本.
2.创建一个目录
├── book.json
├── README.md
├── SUMMARY.md
├── chapter-1/
|   ├── README.md
|   └── something.md
└── chapter-2/
    ├── README.md
    └── something.md
- book.json:存放配置信息,主要包括书名,作者还有一些插件配置
- SUMMARY.md:存放本机的目录
## 1-概要
- [新手指引]()
    - [第一次搭gitbook](1-概要/新手指引/第一次搭gitbook.md)
## 2-寻欢服务端
- [0-技术分享]()
    - [技术分享](2-寻欢服务端/0-技术分享/2.md)
- [1-接口文档]()
    - [接口文档1](2-寻欢服务端/1-接口文档/1.md)
    - [2MD--11](2-寻欢服务端/1-接口文档/2.md)
- [xh-server简介](2-寻欢服务端/xh-server-readme.md)
显示效果: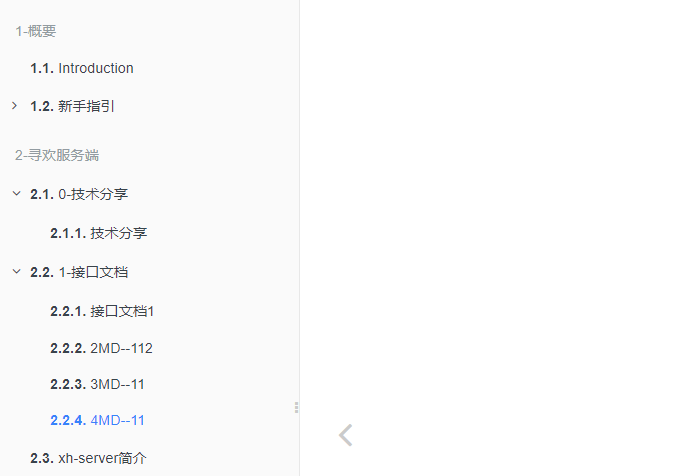
3.配置book.json
{
    "title": "寻欢gitbook",
    "language": "zh-hans",
    "gitbook": ">=3.0.0",
    "plugins": [
        "-highlight", "prism", "prism-themes",
        "-lunr", "-search", "search-plus",
        "splitter",
        "chart",
        "-sharing",
        "anchor-navigation-ex",
        "todo",
        "alerts",
        "expandable-menu",
        "googledocs",
        "theme-comscore",
        "summary"
    ],
    "pluginsConfig": {
        "prism": {
            "css": [
                "prism-themes/themes/prism-ghcolors.css"
            ]
        },
        "chart": {

        },
        "fontSettings": {
            "theme": "white",
            "family": "msyh",
            "size": 2
        },
        "theme-default": {
            "showLevel": true
        },
        "anchor-navigation-ex": {
            "showLevel": true,
            "associatedWithSummary": false,
            "printLog": false,
            "multipleH1": true,
            "mode": "float",
            "showGoTop": true,
            "float": {
                "showLevelIcon": false,
                "level1Icon": "fa fa-hand-o-right",
                "level2Icon": "fa fa-hand-o-right",
                "level3Icon": "fa fa-hand-o-right"
            },
            "pageTop": {
                "showLevelIcon": false,
                "level1Icon": "fa fa-hand-o-right",
                "level2Icon": "fa fa-hand-o-right",
                "level3Icon": "fa fa-hand-o-right"
            }
        },
        "googledocs": {
            "rm": "embedded",
            "frameborder": "0",
            "width": "100%",
            "height": "600px",
            "noembed": "new window"
        }
    }
}
这是一份例子
- title:书名
- language:语言简体中文(可选en, ar, bn, cs, de, en, es, fa, fi, fr, he, it, ja, ko, no, pl, pt, ro, ru, sv, uk, vi, zh-hans, zh-tw)
- gitbook: 指定使用的gitbook版本
- plugins: 插件,要去除自带的插件, 可以在插件名称前面加-
- pluginsConfig:配置插件的属性
4.安装配置的插件
gitbook install
5.本地启动gitbook server
gitbook serve --port 8888
访问 localhost:8888即可看到书籍
关于目录自动生成
只需要在插件中添加:[“summary”],再启动服务器即可
具体参考:https://github.com/julianxhokaxhiu/gitbook-plugin-summary
GitLab自动发布
当我们push代码时,想要书籍服务器自动生成最新的书籍。可以借用 GitLab提供的CI做到。
这里我们可以用webhook或者runner去完成push后回调。
Webhook实现
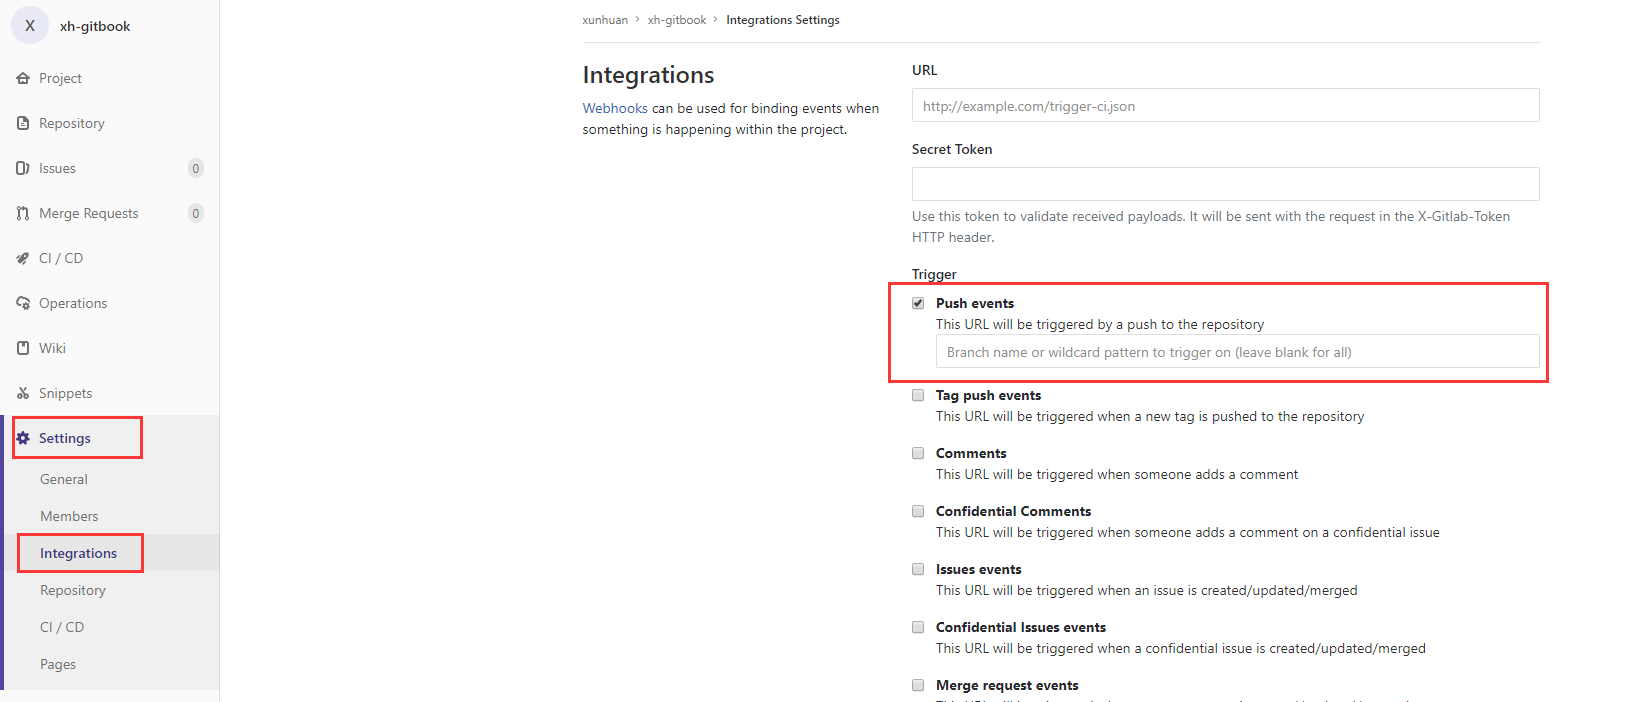
然后再自己实现一个Http接口,触发服务器shell即可
Runner 实现
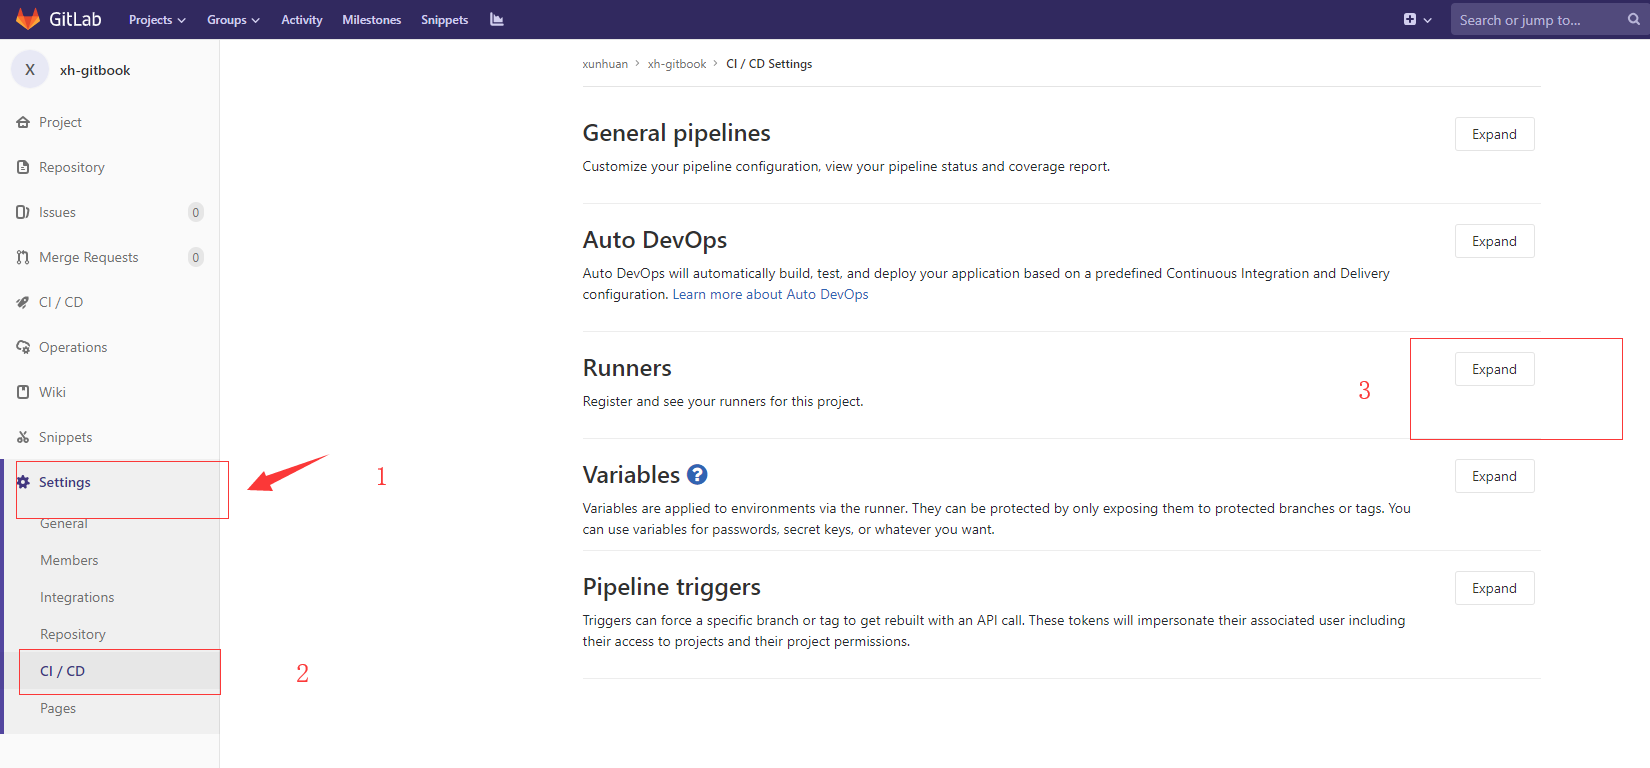
通过安装runner去远程执行命令。
安装GitLab Runner
访问:https://docs.gitlab.com/runner/install/ 下载安装Runner
linux ex:- 下载
sudo wget -O /usr/local/bin/gitlab-runner https://gitlab-runner-downloads.s3.amazonaws.com/latest/binaries/gitlab-runner-linux-amd64 - 给权限
Give it permissions to execute: - 创建CI user
sudo useradd --comment 'GitLab Runner' --create-home gitlab-runner --shell /bin/bash - 安装启动
sudo gitlab-runner install --user=gitlab-runner --working-directory=/home/gitlab-runner sudo gitlab-runner start - 注册到GitLab
根据提示输入GitLab的地址和token。如图红色圈起的部分sudo gitlab-runner register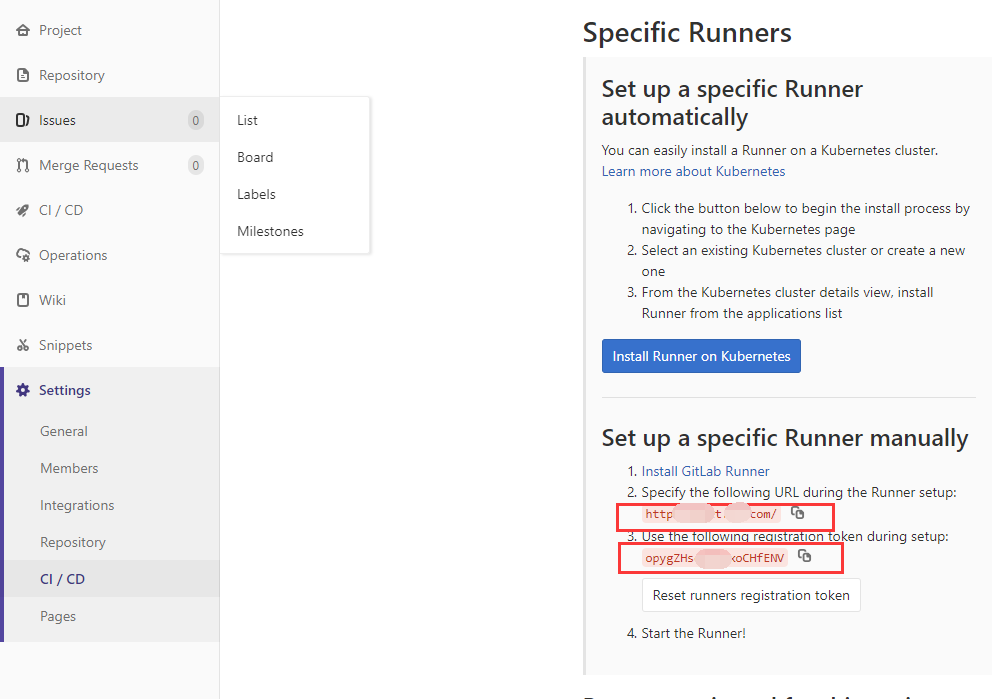
- 输入描述,tag,executor
Please enter the gitlab-ci description for this runner
[hostame] my-runner
Please enter the gitlab-ci tags for this runner (comma separated):
my-tag,another-tag
Please enter the executor: ssh, docker+machine, docker-ssh+machine, kubernetes, docker, parallels, virtualbox, docker-ssh, shell:
shell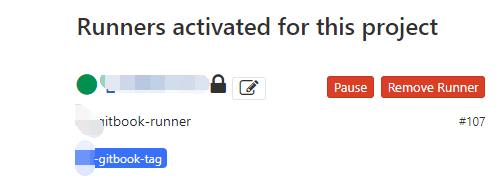
然后在CI就能看到如图的Runner。
- 下载
编写CI脚本
在你的Git目录下,创建 .gitlab-ci.yml :# 开始执行脚本前所需执行脚本 before_script: - echo "===========update start=============" # 脚本执行完后的钩子,执行所需脚本 after_script: - echo "===========update end=============" # 该ci pipeline适合的场景(可以自定义场景,按场景执行Job) stages: - push # 脚本1 job-remoteUpdate: stage: push script: - cd /data/gitbook/xh-gitbook/ - git pull only: - master tags: - xh-gitbook-tag这个脚本的意思就是,会去Runner运行的远程机器上,运行
- cd /data/gitbook/xh-gitbook/
- git pull
两个命令,拉取你push的最新代码。执行成功后会在GitLab中显示
- 自动更新
当Runner执行完git pull后,远程机器上的gitbook serve能检查到书籍文件发生变化,会自动重启生成最新的书籍。
问题
安装中遇到一个问题,在window10上,使用git pull更新gitbook文件后,gitbook serve会崩溃。正常现象。linux可以执行自动更新。